Monday, August 31, 2009

Coronado Concerts in the Park: Challenge GREECE

Our Coronado Summer Concerts in the Park season is winding down, with only two more Sunday concerts remaining. What will we do with our Sundays! Relax??

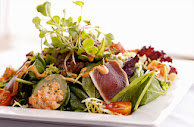
Last night, we journeyed to Greece for our culinary Challenge. Although we had a small group, our smorgasbord of Greek fare was diverse and glorious.

My first thought was Moussaka or Pastitsio. But with the heat and wildfires raging through Southern California, I shifted my thoughts to something lighter and suitable for the grill - much too hot to heat up the kitchen or the oven!

I go through the same routine every week in order to come up with unique and park/picnic-friendly ideas...surfing the net, including various food blogs, cooking magazine web sites, Epicurious, Food Network, TS & FG, and flipping though the increasing number of cookbooks and food magazines scattered around the house.

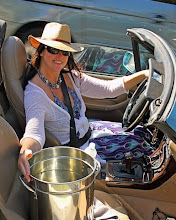
I wanted to use lamb as my main ingredient, and Bobby Flay's Merguez Sausage and Lamb Tenderloin Souvlaki first caught my interest. I knew Bristol Farms carried the sausage. I made my shopping list and we jumped in the car Saturday night, put the top down, and drove up the coast to La Jolla. Unfortunately, no Merguez sausage or lamb tenderloin! I had also perused some Chicken Souvlaki recipes, and knew the chicken would substitute nicely with the other ingredients in Bobby's recipe. Actually, I'm glad it worked out that way. The grilled chicken was nicely enhanced by the olive oil, lemon, garlic and oregano marinade. I especially enjoyed the roasted red pepper yogurt sauce, which was an innovative transition from the traditional cucumber yogurt sauce.

Chicken Souvlaki
Adapted from Bobby Flay's Souvlaki with Merguez Sausage and Piquillo Pepper Yogurt Sauce, and various Chicken Souvlaki recipes

Ingredients:

3/4 cup extra virgin olive oil
Juice and zest of one lemon
4 garlic cloves, minced
1 tablespoon chopped, fresh oregano
1/4 teaspoon red pepper flakes
2 lbs. boneless, skinless chicken breasts , sliced into strips for threading on skewers

Wooden skewers, soaked in water for 30 minutes
Salt and freshly ground pepper
8 pocket pita breads
1 yellow onion, sliced into thick rings, and grilled
2 red peppers, cut in half, seeds and stems removed, grilled and then sliced
2 lemons, cut in half and grilled briefly
Piquillo Pepper Yogurt Sauce, recipe follows

Whisk together the oil, garlic, lemon juice, lemon zest, and oregano in a large bowl. Chill until ready to use.

Prepare the red pepper sauce.

Piquillo Pepper Yogurt Sauce:

2 cups thick Greek yogurt
4 piquillo peppers, or 2 roasted red peppers
6 cloves garlic, coarsely chopped
2 teaspoons grated lemon zest
2 teaspoons chopped fresh oregano leaves
Salt and freshly ground pepper

Put all ingredients, except salt and pepper, in a blender and blend until smooth. Season, to taste, with salt and pepper. Transfer to a small serving bowl and refrigerate until ready to serve.

Add the chicken to the marinade and toss to coat. Refrigerate the chicken in the marinade for about 15 minutes, then skewer the chicken onto the presoaked wooden skewers, and season with salt and pepper.

Preheat the grill to medium-high. Grill the onions, red peppers and lemons, and set aside. Then, grill the skewered chicken until golden brown on all sides, about 10 minutes total, and transfer to a platter. Grill the pita on both sides for about 20 seconds to warm through.

For dessert, I found a Food & Wine recipe for Greek Yogurt Panna Cotta with Honey-Glazed Apricots. I can't believe I've never made panna cotta! I came across so many variations, flavors, and beautiful presentations, but this recipe was absolutely perfect for our Greek theme.

Greek Yogurt Panna Cotta with Honey-Glazed Apricots
Food & Wine, recipe by Kate Newman

Ingredients:

1 envelope unflavored gelatin (2 1/4 teaspoons)
2 tablespoons cold water
1 cup heavy cream
1/3 cup sugar
1 vanilla bean, split, seeds scraped
One 17.6-ounce tub of Greek yogurt, such as Fage Total brand (2 cups)
1 cup dried apricots
1 cup semi-dry white wine, such as Vouvray
1/4 cup honey

Bristol Farms came through for my dessert - Fage Greek yogurt and Vouvray wine!

Directions:

In a small bowl, sprinkle the gelatin over the cold water; let stand until softened, 5 minutes. In a small saucepan, bring the cream, sugar and vanilla bean and seeds to a simmer.

Off the heat, stir in the gelatin until melted. In a bowl, whisk the yogurt until smooth. Gradually whisk in the vanilla cream; remove the vanilla bean. Pour the mixture into six 1/2-cup ramekins and refrigerate until set, at least 3 hours.

I bought a dozen of these espresso cups when I tackled Thomas Keller's Coffee & Doughnuts, Cappuccino Semifreddo and Cinnamon Sugar Doughnuts, for last summer's Concert in the Park finale challenge.

Meanwhile, in a small saucepan, simmer the apricots in the white wine over moderately low heat until the apricots are plump and the wine has reduced by half, about 20 minutes. Stir in the honey and simmer the syrup until thickened, about 5 minutes; let cool.

This measuring device is so cool for honey, syrup, molasses, etc.

Apricots plumped with wine and honey

For plating, run a knife around the inside of each ramekin. Set a plate on each ramekin and invert each Panna Cotta onto a plate. You may have to tap and shake the ramekins to loosen the Panna Cotta. Slice the apricots and spoon them on top of the Panna Cotta. Drizzle with some of the honey syrup and serve.

I added a few chopped pistachios over the top of this one.

For easier transport and serving at the Park, I left the remaining Panna Cotta in the espresso cups. Just prior to serving, I dusted a little cinnamon sugar over the top. The honeyed wine syrup flowed down into the cup with the first delicious bite.

Our second dessert of the evening was John's Apollo's Risotto Pudding, served in Phyllo cups and drizzled with blackberry syrup. Brilliant idea - those homemade, cinnamon phyllo cups. My Panna Cotta would have been beautiful in those!


And, completing our Greek table: Pam's Greek Salad, and Kai's Souzoukákia (made with ground lamb and beef), Lachanosaláta (Cabbage Salad), Tsatzíki, and Marinated Feta.

I find it truly amazing that we manage to show up at the park, week after week, without conferring beforehand, and have yet to duplicate dishes!

Thank you for a wonderful journey to Greece! Next week, we're off to Peru!

***REMEMBER, the music starts at 5:00 p.m. for the last two concerts.

Thursday, August 27, 2009

Dobos Torte, a Hungarian speciality, for The Daring Bakers

The August 2009 Daring Bakers' challenge was hosted by Angela, A Spoonful of Sugar, and Lorraine, Not Quite Nigella. They chose the spectacular Dobos Torte based on a recipe from Rick Rodgers' cookbook, Kaffeehaus: Exquisite Desserts from the Classic Caffés of Vienna, Budapest, and Prague.

The Dobos Torte is a five-layer sponge cake, filled with a rich chocolate buttercream and topped with thin wedges of caramel. You may come across recipes which have anywhere between six and 12 layers of cake; there are numerous family variations! It was invented in 1885 by József C. Dobos, a Hungarian baker, and it rapidly became famous throughout Europe for both its extraordinary taste and its keeping properties. The recipe was a secret until Dobos retired in 1906 and gave the recipe to the Budapest Confectioners' and Gingerbread Makers' Chamber of Industry, providing that every member of the chamber can use it freely.

The reveal date for this month's Challenge came rather quick and, as a result, I was kinda scrambling at the end. I would have preferred to spend a leisurely Saturday or Sunday preparing my Dobos, but it didn't work out that way. I made the buttercream frosting one evening, and the cake layers the next. I assembled most of it the second night, but had to get up at 6:00 a.m. this morning to prepare the caramel wedges and take my photographs.

Midstream, I decided to make four, mini Dobos. I intended to follow the recipe and make six, 9" layers, but the batter only yielded five layers. I think the torte looks nicer with the added height of more layers, and I was able to use a 3" cookie cutter and cut my five, 9" rounds, into 28, 3" rounds.

My caramel had issues. It didn't completely harden and began to wilt after a few minutes of standing upright.

Overall, I think these came out better than I expected. I haven't had a chance to taste one, but I did make a pretty good dinner out of licking my fingers of Amaretto Buttercream last night. I also used an eggless buttercream recipe I found on Smitten Kitchen, and added a splash of Amaretto. I highly recommend this quick, luscious, buttercream! It's made in the food processor in a matter of minutes.

Here's the official recipe, as provided by our hostesses. Thank you, Angela & Lorraine, for a fantastic challenge. Thank you also to our Daring Kitchen founders, Lis of La Mia Cucina and Ivonne of Cream Puffs in Venice. Be sure to visit the Daring Bakers' Blogroll to see what this amazing group has come up with this month!

Equipment

2 baking sheets
9” (23cm) springform tin and 8” cake tin, for templates
Mixing bowls (1 medium, 1 large)
Sieve
Double boiler (a large saucepan plus a large heat-proof mixing bowl which fits snugly over the top of the pan)
Small saucepan
Whisk (you could use a balloon whisk for the entire cake, but an electric hand whisk or stand mixer will make life much easier)
Metal offset spatula
Sharp knife
7 1/2” cardboard cake round, or just build cake on the base of a springform tin.
Piping bag and tip, optional

Prep times: Sponge layers: 20 minutes prep, 40 minutes cooking total if baking each layer individually. Buttercream: 20 minutes cooking. Cooling time for buttercream: about 1 hour plus 10 minutes after this to beat and divide. Caramel layer: 10-15 minutes. Assembly of whole cake: 20 minutes.

Sponge cake layers

6 large eggs, separated, at room temperature
1 1/3 cups (162g) confectioner's (icing) sugar, divided
1 teaspoon (5ml) vanilla extract
1 cup plus 2 tablespoons (112g) sifted cake flour (SUBSTITUTE 95g plain flour + 17g cornflour (cornstarch) sifted together)
pinch of salt

Chocolate Buttercream

4 large eggs, at room temperature
1 cup (200g) caster (ultrafine or superfine white) sugar
4oz (110g) bakers chocolate or your favourite dark chocolate, finely chopped
2 sticks plus 2 tablespoons (250g) unsalted butter, at room temperature.

Caramel topping

1 cup (200g) caster (superfine or ultrafine white) sugar
12 tablespoons (180 ml) water
8 teaspoons (40 ml) lemon juice
1 tablespoon neutral oil (e.g. grapeseed, rice bran, sunflower)

Finishing touches

a 7” cardboard round
12 whole hazelnuts, peeled and toasted
½ cup (50g) peeled and finely chopped hazelnuts

Directions for the sponge layers:
(The sponge layers can be prepared in advance and stored interleaved with parchment and well-wrapped in the fridge overnight)

Position the racks in the top and centre thirds of the oven and heat to 400F (200C). Cut six pieces of parchment paper to fit the baking sheets. Using the bottom of a 9" (23cm) springform tin as a template and a dark pencil or a pen, trace a circle on each of the papers, and turn them over (the circle should be visible from the other side, so that the graphite or ink doesn't touch the cake batter).

Beat the egg yolks, 2/3 cup (81g) of the confectioner's (icing) sugar, and the vanilla in a medium bowl with a mixer on high speed until the mixture is thick, pale yellow and forms a thick ribbon when the beaters are lifted a few inches above the batter, about 3 minutes You can do this step with a balloon whisk if you don't have a mixer).

In another bowl, using clean beaters, beat the egg whites until soft peaks form. Gradually beat in the remaining 2/3 cup (81g) of confectioner's (icing)sugar until the whites form stiff, shiny peaks. Using a large rubber spatula, stir about 1/4 of the beaten whites into the egg yolk mixture, then fold in the remainder, leaving a few wisps of white visible. Combine the flour and salt. Sift half the flour over the eggs, and fold in; repeat with the remaining flour.

Line one of the baking sheets with a circle-marked paper. Using a small offset spatula, spread about 3/4cup of the batter in an even layer, filling in the traced circle on one baking sheet. Bake on the top rack for 5 minutes, until the cake springs back when pressed gently in the centre and the edges are lightly browned. While this cake bakes, repeat the process on the other baking sheet, placing it on the centre rack. When the first cake is done, move the second cake to the top rack. Invert the first cake onto a flat surface and carefully peel off the paper. Slide the cake layer back onto the paper and let stand until cool. Rinse the baking sheet under cold running water to cool, and dry it before lining with another parchment. Continue with the remaining papers and batter to make a total of six layers. Completely cool the layers. Using an 8" springform pan bottom or plate as a template, trim each cake layer into a neat round. (A small serrated knife is best for this task.)

Directions for the chocolate buttercream:
(This can be prepared in advance and kept chilled until required).

Prepare a double-boiler: quarter-fill a large saucepan with water and bring it to a boil. Meanwhile, whisk the eggs with the sugar until pale and thickened, about five minutes. You can use a balloon whisk or electric hand mixer for this. Fit bowl over the boiling water in the saucepan (water should not touch bowl) and lower the heat to a brisk simmer. Cook the egg mixture, whisking constantly, for 2-3 minutes until you see it starting to thicken a bit. Whisk in the finely chopped chocolate and cook, stirring, for a further 2-3 minutes. Scrape the chocolate mixture into a medium bowl and leave to cool to room temperature. It should be quite thick and sticky in consistency. When cool, beat in the soft butter, a small piece (about 2 tablespoons/30g) at a time. An electric hand mixer is great here, but it is possible to beat the butter in with a spatula if it is soft enough. You should end up with a thick, velvety chocolate buttercream. Chill while you make the caramel topping.

Lorraine's note: If you're in Winter just now your butter might not soften enough at room temperature, which leads to lumps forming in the buttercream. Male sure the butter is of a very soft texture, i.e., running a knife through it will provide little resistance, before you try to beat it into the chocolate mixture. Also, if you beat the butter in while the chocolate mixture is hot you'll end up with more of a ganache than a buttercream!

Directions for the caramel topping:

Choose the best-looking cake layer for the caramel top. To make the caramel topping: Line a jellyroll pan with parchment paper and butter the paper. Place the reserved cake layer on the paper. Score the cake into 12 equal wedges. Lightly oil a thin, sharp knife and an offset metal spatula. Stir the sugar, water and lemon juice in a small saucepan. Bring to a boil over a medium heat, stirring often to dissolve the sugar. Once dissolved into a smooth syrup, turn the heat up to high and boil without stirring, swirling the pan by the handle occasionally and washing down any sugar crystals on the sides of the pan with a wet brush until the syrup has turned into an amber-coloured caramel. The top layer is perhaps the hardest part of the whole cake so make sure you have a oiled, hot offset spatula ready. I also find it helps if the cake layer hasn't just been taken out of the refrigerator. I made mine ahead of time and the cake layer was cold and the toffee set very, very quickly—too quickly for me to spread it. Immediately pour all of the hot caramel over the cake layer. You will have some leftover most probably but more is better than less and you can always make nice toffee pattern using the extra to decorate. Using the offset spatula, quickly spread the caramel evenly to the edge of the cake layer. Let cool until beginning to set, about 30 seconds. Using the tip of the hot oiled knife (keep re-oiling this with a pastry brush between cutting), cut through the scored marks to divide the caramel layer into 12 equal wedges. Cool another minute or so, then use the edge of the knife to completely cut and separate the wedges using one firm slice movement (rather than rocking back and forth which may produce toffee strands). Cool completely.

Angela's note: I recommend cutting, rather than scoring, the cake layer into wedges before covering in caramel (reform them into a round). If you have an 8” silicon round form, then I highly recommend placing the wedges in that for easy removal later and it also ensures that the caramel stays on the cake layer. Once set, use a very sharp knife to separate the wedges.

Assembling the Dobos:

Divide the buttercream into six equal parts. Place a dab of chocolate buttercream on the middle of a 7 1/2” cardboard round and top with one cake layer. Spread the layer with one part of the chocolate icing. Repeat with 4 more cake layers. Spread the remaining icing on the sides of the cake. Optional: press the finely chopped hazelnuts onto the sides of the cake. Propping a hazelnut under each wedge so that it sits at an angle, arrange the wedges on top of the cake in a spoke pattern. If you have any leftover buttercream, you can pipe rosettes under each hazelnut or a large rosette in the centre of the cake. Refrigerate the cake under a cake dome until the icing is set, about 2 hours. Let slices come to room temperature for the best possible flavour.

Storage: Store this cake at room temperature under a glass dome, but your mileage may vary. If you do decide to chill it, also use a glass dome if you have one. The cake will cut more cleanly when chilled.

Variations: Shape: The traditional shape of a Dobos Torte is a circular cake, but you can vary the shape and size if you want. Sherry Yard, Desserts By The Yard, makes a skyscraper Dobos by cutting a full-size cake into four wedges and stacking them to create a tall, sail-shaped cake. Mini Dobos are also very cute, and you can perch a little disc of caramel on top. Flavour: Dark chocolate buttercream is traditional, but different flavored buttercreams could be used. You can also brush each layer with a flavoured syrup for a hint of a second flavour. Nuts: Nuts are optional for decoration. If you don't care for hazelnuts, you can substitute for another variety that you like.

Egg concerns: The cooking process for the buttercream will produce lightly cooked eggs. If you fall into a vulnerable health group, you may wish to use an egg-less buttercream.

Happy Birthday, Melinda! This one's for you!

Tuesday, August 25, 2009

Coronado Concerts in the Park - Challenge Gourmazing Fast Food

Our theme this past Sunday evening, Gourmazing Fast Food, challenged us to take fast food to a new level and transform it into something gourmet and amazing!

What immediately comes to mind when you think of fast food? Burgers, hot dogs, french fries, pizza, KFC, Mexican food...basically anything from fast food establishments, ball parks, movie theatres, shopping mall food courts, etc. It wasn't the healthiest of our summer culinary challenges, but we had quite a variety of creative transformations.

Hot Dog on a Stick's trademark foods are Hot Dogs on a Stick (corn dogs) and lemonade. The company has expanded its menu items to include American and Pepper Jack Cheese on a Stick and Veggie Dogs on a Stick.

John set the bar with his gourmazing Fois Gras Pate on a Stick. He also offered Brie on a Stick, with jalapeno pepper jelly; Little Smokies Sausages on a Stick, with spicy mustard; Blackberries on a Stick, dusted with powdered sugar, and Snicker Bars on a Stick!

Our wagon was converted into a mini deep fryer station and all Sticks were made to order!

Fois Gras Pate on a Stick!

I think Kai is sampling the Fois Gras one here, but his favorite was Brie on a Stick. John added some chopped nuts in the batter for texture and flavor.

Also at the top of the gourmazing menu: Kai's Lobster Rolls with Garlic Mayonnaise. Kai and Hillary just returned from 3 weeks in Germany, bearing gifts I might add...thank you! I loved Kai's presentation of his Lobster Rolls, all wrapped up and standing up in a basket. He added a little Lobster roe to the one on top.

Alec and Nina prepared splendid creations: Alec's gourmazing Pizzas - Heirloom Tomato & Asparagus, and Caramelized Onion, Mushroom & Pancetta


Nina's Apple Pies were outstanding. She transformed McDonald's version using Barefoot Contessa's Apple Crisp and Bobby Flay's Caramel Sauce recipes. Her pies were also presented very creatively.

Bill and Janice joined us this week, offering Chicken, Spinach, Mushrooms and Gouda Cheese Quesadillas. Janice used fresh tortillas from the hood, and drizzled the quesadillas with warm Queso Blanco

Jim, alone in the kitchen with Carmen away, whipped up Caramelized Onion and Hot Dog Casserole.

Pam, our Salad Angel, went with Buffalo Chicken Tenders as the gourmazing ingredient in her Chef Salad - complemented by McP's infamous buffalo wing sauce.

Bradly served up Gourmazing Garlic Fries

Rich slipped in late with a platter of Spam Sliders, and Mary (yes you heard me right) stunned the crowd with her Taco Salad ;-)

And last, but not least....

My contribution to the cause was Bread Pudding, made with Doughnuts, aka Caramelized Pear & Doughnut Pudding with Kentucky Bourbon Sauce. Would you care for a doughnut with your bourbon? OMG, I suspected a cup of bourbon in the sauce was a bit excessive! However, my dessert did receive some rave reviews. The cake doughnut flavor was not overpowered, surprisingly, by the bourbon soaked raisins and bourbon sauce. If you're interested, and of legal drinking age, I was inspired by Tyler Florence's Brioche and Berry Bread Pudding with Lemon Fondant. I followed the recipe for Bourbon Sauce found here, at Simply Recipes and followed Cooks Illustrated Bread Pudding recipe, substituting doughnuts.

Start with a dozen doughnuts

Break them into pieces, place on a cookie sheet, and toast in the oven

Meanwhile, drown some raisins in bourbon

Saute sliced pears in butter and brown sugar and then place in the bottom of ramekins. I did this because I wanted to invert the puddings for plating (I ended up leaving them in the ramekins for the park, to keep warm and for easier serving). The one I did invert looked like a cute, little upside down pear pudding.

I also made one in a small springform pan for our neighbors, Jim & Melinda, who now refuse to sit with us at the park because they are "intimidated" by our cooking!

Here are all the ramekins, filled with the doughnut-pudding mixture

And here's the final plating, drizzled with decadent bourbon sauce and topped with a few of John's blackberries

It was an entertaining culinary challenge and the Marine Band rocked!

On Sunday, our theme is Greek Cuisine! Only three more Summer Concerts in the Park...

Monday, August 24, 2009

Linguine with Pesto, Green Beans, and Potatoes

Pasta. It's my ultimate comfort food.

After focusing all of our attention on Diver this past week, and caring for him during his recovery from that nasty spider bite, I was finally able to relax in the kitchen on Saturday afternoon and find some of my own solace.

I recently came across my Il Fornaio Pasta Book, by Maurizio Mazzon, and was instantly drawn to the beautiful photos of simple, rustic, soothing bowls of pasta. I marked at least 10 recipes to try. The first, Linguine with Pesto, Green Beans, and Potatoes, features homemade pesto.

I love the little basil plants available in the markets these days. The plant sits in a copper pot on our kitchen counter until we pinch off and use all the leaves. The remaining ingredients for this dish include Parmigiano-Reggiano, Pecorino Romano, French green beans, Yukon gold potatoes, toasted pine nuts, and dried linguine

It's so effortless to make your own pesto. Just whirl together fresh basil, garlic, cheese and pine nuts


Slowly drizzle in the olive oil. Add salt and pepper, and sour cream, and you're done in a matter of minutes.

Linguine with Pesto, Green Beans, and Potatoes
Slightly adapted from Il Fornaio Pasta Book, by Maurizio Mazzon

50 fresh medium basil leaves, washed and dried thoroughly
4 garlic cloves
3/4 cup freshly grated Parmigiano-Reggiano
1/3 cups freshly grated Pecorino Romano
2 tablespoons pine nuts, lightly toasted
1/2 cup extra-virgin olive oil
1/2 teaspoon salt
1/4 teaspoon freshly ground pepper
1 tablespoon creme fraiche, or sour cream
1/2 lb. Yukon gold potatoes, peeled, quartered, and cut into 1/2 inch thick slices
1/4 lb. green beans, cut into 1-inch lengths
1 pound dry linguine

Place the basil in the bowl of a food processor and chop fine. Add the garlic and continue chopping. Add the Parmigiano, Pecorino, and pine nuts and process until the nuts are chopped fine. Gradually add the olive oil while the motor is running. Add 1/2 teaspoon of the salt and the pepper and pulse to combine. Add the creme fraiche and pulse to combine.

Bring a large pot of water, and about 5 teaspoons of salt to a boil. Add the green beans and cook until crisp-tender, about 4 minutes. Using slotted spoon or small stainer, transfer beans to large bowl. Return cooking water to boil. Add Yukon gold potatoes and boil until tender, about 7 minutes. Remove potatoes and transfer to bowl with beans. Return cooking water to boil. Add pasta to same pot. Boil until pasta is just tender but still firm to bite, stirring occasionally, about 10 minutes. Drain pasta, reserving 1 cup cooking water. Return green beans, potatoes and cooked pasta to pot. Add pesto and toss to coat. Gradually add enough reserved cooking water to coat pasta with moist sauce. Season to taste with salt and pepper. Serve immediately.

This pasta was very flavorful and satisfying. I think roasting the potatoes, rather than boiling them in the pasta water, would be a nice variation. Also, next time, I will sprinkle a few toasted pine nuts and a little more grated cheese over the top.

With the hint of autumn in the air, and the arrival of our gorgeous, farmhouse-style dining room table, I envision sharing many more bowls of pasta with friends and family in the coming months.

Tuesday, August 18, 2009

Daybreak at Del Mar, Pumpkin Waffles for Breakfast, and Coffee for Dinner

Daybreak at Del Mar, truly one of the highlights of the Del Mar racing season. Early risers have the opportunity to watch the morning workouts while enjoying breakfast, track side, on the Clubhouse Terrace.

On Saturday morning, John and I left the Island a little past 6, and arrived at the track just as the sun was breaking through the marine layer. Although I love the glamour of the Turf Club, the thrill of the race, and the excitement of cashing in a winning ticket, it's a very unique and special experience to watch these incredibly beautiful and magnificent thoroughbreds in the early morning calm of this picturesque seaside track.


After taking over 700 photos, we returned home and made our own breakfast...Pumpkin Waffles, a recipe from Gourmet, and made famous locally by San Diego's Cafe 222.

Pumpkin Waffles
Gourmet, November 2000

Measure all of the following ingredients into a medium bowl

2 1/2 cups all-purpose flour
1/3 cup packed light brown sugar
2 1/4 teaspoons baking powder
1 teaspoon baking soda
1/2 teaspoon salt
2 teaspoons ground cinnamon
1 teaspoon ground ginger
1/4 teaspoon ground cloves

Whisk to combine

In a large bowl, whisk 4 eggs until blended. Then, whisk in 1 cup milk, 1 cup buttermilk, 1 cup canned solid-packed pumpkin, and 6 tablespoons butter (melted) until smooth.


Whisk in dry ingredients just until smooth

Brush waffle iron lightly with oil and spoon batter into waffle iron, spreading quickly. I was a bit overzealous with the batter on this one!

And this one was a little shy on batter.

Transfer waffles to rack in a 250 degree F oven to keep warm and crisp. Serve waffles with butter and warm, pure maple syrup, sausage patties, and orange juice. I didn't use them this time, but a sprinkling of toasted pecans is also a nice topping for the waffles.

Our Sunday didn't go as well as our Saturday.

Unfortunately, Diver, our 2-year-old Newfoundland, became suddenly ill on Sunday morning. We spent most of day at an emergency veterinary hospital and, as a result, did not make it to Concert in the Park for our scheduled Challenge Coffee culinary battle.

The veterinarians have been unable to come up with an answer as to why our boy's rear leg and foot became severely swollen and infected. The first impression was a snake bite, but we don't have snakes in Coronado. The latest suspicion is a spider bite, maybe from one of the Recluses found in CA.

Thankfully, he is doing much better with high doses of antibiotics, pain killers, and daily vet re-checks. Poor boy, it's just heartbreaking when he looks up at you with his soft brown eyes and you can feel his pain.

After things settled down a little on Sunday evening, I went ahead and made my Espresso Crusted Filet Mignon and Gorgonzola Crostini. I found this recipe, by Marc Bruzzio, for Espresso Crusted Filet with Gorgonzola Sauce, and planned on adapting it for something more suitable for a picnic in the park. It turned out quite nice and would have been perfect. Sorry gang, I would have loved to share it with you.

Espresso Crusted Filet Mignon and Gorgonzola Crostini

2 8 oz. filet mignons
2 tablespoons minced shallots
1/4 cup instant espresso
1/4 teaspoon cayenne pepper
3/4 cup heavy cream
4 oz. crumbled Gorgonzola
1 teaspoon chopped fresh thyme
1/4 cup dry white wine
Olive oil
Salt & pepper
1 French baguette, thinly sliced

Season filets on both sides with salt and pepper. Mix together espresso and cayenne pepper. Coat all sides of filet with mixture.


In a sauce pan, saute minced shallots in about 2 tablespoons olive oil, until translucent and fragrant. Add thyme and stir for about 30 seconds. Add wine and stir for 1 minute, and then add the crumbled Gorgonzola, heavy cream, and salt and pepper to taste. Stir constantly until thick and reduced by half. Transfer to bowl and let cool, then refrigerate until ready to use.

To prepare the crostini, preheat the oven to 375 degrees F. Brush the bread on both sides with the olive oil and season lightly with salt and pepper. Arrange on a baking sheet and bake until crusty and brown, about 10 to 12 minutes. Turn once about halfway through cooking.

For the filets, add 4 tablespoons olive oil to saute pan. Heat the oil, add the filets, and sear about 1 minute on each side. Place the filets on a baking sheet and bake in a 400 degree F oven for 15 minutes. Tent with foil, let rest 5 minutes, and slice.

To serve, spread the chilled Gorgonzola on the crostini and top with a slice of filet.

For dessert, I made David Lebovitz' Tiramisu Ice Cream, from The Perfect Scoop

This would not have traveled very well to the park as it's a very soft ice cream and should be eaten directly out of the freezer. The flavors are wonderful, especially the brandy! I cooked my Espresso Ripple a little too long, and it was slightly crunchy in the ice cream. I also added some leftover caramel when I layered in the ripple.

Tiramisu Ice Cream with Espresso Ripple

2 cups Mascarpone cheese
1 cup half-and-half
2/3 cup sugar
Pinch of salt
1/4 cup coffee-flavored liqueur, such as Kahlua
3 tablespoons brandy or dark rum
Espresso Ripple (recipe below)

Puree the Mascarpone, half-and-half, sugar, salt, liqueur, and brandy together in a blender or food processor until smooth and the sugar is dissolved. Chill thoroughly in the refrigerator.

Freeze in your ice cream maker according to the manufacturer’s instructions. As you remove it from the machine, alternate layers of Mocha Ripple with the ice cream in the storage container.

For the Espresso Ripple:

1/2 cup sugar
1/3 cup light corn syrup
1/2 cup strongly brewed espresso
6 tablespoons unsweetened Dutch-process cocoa powder
1/2 teaspoon vanilla extract

Whisk together the sugar, corn syrup, espresso, and cocoa powder in a medium saucepan. Heat over medium heat, whisking constantly, until the mixture begins to bubble at the edges. Continue to whisk until it just comes to a low boil. Cook for 1minute, whisking frequently. Remove from the heat, stir in the vanilla, and let cool. Chill in the refrigerator before using.

The Espresso Ripple should be thoroughly chilled. Just before you remove the ice cream from the machine, spoon some of the espresso ripple onto the bottom of the storage container. As you remove the ice cream from the machine, layer generous spoonfuls of the sauce between layers of ice cream. Avoid stirring the Ripple, as it will make the ice cream muddy looking.

Get well soon, Diver Dog. We love you.