Friday, April 29, 2011

French Fridays with Dorie: Bistrot Paul Bert Steak au Poivre and Pommes Soufflé

Congratulations, Dorie! If you haven't heard, In the Kitchen and On the Road with Dorie is a finalist in the 2nd Annual Saveur Best Food Blog Awards, Best Professional Blog category. You can vote through May 12, 2011.

For this week's French Fridays with Dorie recipe, Bistrot Paul Bert Pepper Steak, Dorie takes us to Bistrot Paul Bert, one of her favorite family-owed bistros in Paris. The tagline on the chalkboard menu always reads: Iciles viandes sont servies bleues, saignantes, ou malcuites...we serve meat blue [just barely warm in the center], rare, or badly cooked. She sings praises of the bistro's Steak Frites in her blog post, The Paris Ten: Must-Tastes...

To my mind, the best version of the classic steak-frites dish is found at Bistro Paul-Bert (18 rue Paul-Bert, Paris 11), which is a good thing for me because the place is also one of my hands-down favorite bistros, and you can't beat the combination of having the iconic dish in a setting that's Parisian through and through.  It also doesn't hurt that Bistro Paul-Bert has a remarkable wine list.


carte postale du restaurant ©paul bert, from Linternaute


It's been a while since we've enjoyed a nice steak, so I splurged on a couple of thick filets. At Bistrot Paul Bert, the steak comes with frites, and after reading The New York Times' article, Steak Frites:  Seeking the Best of a Classic, and watching the accompanying slideshow narrated by Mark Bittman, Steakout in Paris, I had to try making Pommes Soufflé. They are adorable balloon-like fries that require peeling and slicing the potatoes 1/4 inch thick, preferably with a mandoline, soaking them in ice water for 25 minutes, patting dry, and then double-frying them, first in 325 degree F oil, and then a second time at 375 degrees.   Proper puffage can be affected by the age of the potatoes, humidity in the air, and oil temperature.  For your standard bistro frites, the double-frying method is also used, but the potatoes are not soaked in water - very important!


Bistro owner, Bertrand Auboyneau, uses filet mignon for his Pepper Steak, pressed with coarsely cracked Sarawak pepper, pan-seared, and topped with a quick Cognac and cream sauce.  Dorie recommends using Sarawak pepper to replicate Bert's dish, and I tracked some down through Pepper-Passion.

Over the last hundred years, Sarawak Pepper has been exported throughout the world from Sarawak on Borneo Island, Malaysia. It has gained international recognition by chefs and gourmets as one of the favorite pepper ingredients due to its distinctive flavor and taste perfected through years of government research effort. It has a mild flavor with a fresh aroma that is often described as fruity, with hints of chocolate and Syrah.


The peppercorns are coarsely cracked with a mortar and pestle

Cracked peppercorns sprinkled and
pressed onto both sides of the filets

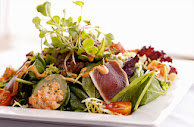
Due to the thickness of our filets (those puppies were at least 2 inches thick), I was unable to fully cook them on top of stove with Dorie's method. I pan-seared them first, and then transferred the pan to the oven to finish cooking. I was not wowed by the Cognac-cream sauce - all I really tasted was cream. To add a bit more flavor, I added a touch more Cognac, cooked it down a bit, and then added a tiny bit of Worcestershire sauce and Dijon mustard, and a little more cream at the end. I achieved beautiful puffed potatoes with less than half of my potato slices, so we had a mix of Pommes Soufflé and potato chips, and steamed asparagus, with our Steak au Poivre.


There are slight variations of the Cognac-cream pan sauce that typically accompanies Steak au Poive, but I prefer the addition of some shallots and a little beef broth. Also, finishing the filets in the oven is necessary for thicker cuts of tenderloin. In Dorie's book, she also provides a recipe for Bistrot Paul Bert's Steak a la Bourguignonne - steak with red wine, garlic and shallot sauce.  Next time I splurge on red meat, I'll be sure to try that sauce.

Filet of Beef au Poivre
Adapted from Around My French Table: More Than 300 Recipes from My Home to Yours
Serves 2

Two 8-ounce filet mignon steaks
Kosher salt
1 tablespoon black peppercorns, coarsely ground
1 tablespoon unsalted butter
1 tablespoon extra-virgin olive oil
2 tablespoons minced shallots
1/2 cup canned beef broth
1/4 cup Cognac or brandy
1/4 cup heavy whipping cream

Preheat the oven to 375 degrees F.

Season both sides of the filet mignon with salt, and then press the black pepper evenly onto both sides of the filets. Allow to rest at room temperature for 15 minutes.

In a large heavy, ovenproof skillet, heat the butter and olive oil over medium-high heat until almost smoking. Place the filets in the hot pan and cook until well-seared on one side, about 3 minutes. Turn the filets over and then transfer the pan to the oven. Cook for about 10 minutes, or until the filets are medium-rare (internal temperature of 125-130 degrees F). Remove the filets to a platter to rest, and tent with aluminum foil to keep warm.

Return the pan to the stove over medium-high heat. Add the shallots to the pan and cook for 2 minutes. Add the beef broth and allow to reduce by half, scraping the brown bits from the bottom of the pan. Carefully add the Cognac (use caution, it may ignite), and cook over allow to simmer for about 2 minutes. Lower the heat to medium-low, add the cream, and simmer for 3-4 minutes. Season with salt to taste.

Serve the steaks with the sauce poured on top.

French Fridays with Dorie is an online cooking group, that just hit 2,000 members, dedicated to Dorie Greenspan‘s newest book, Around My French Table: More Than 300 Recipes from My Home to Yours. As members of the group, we have purchased the cookbook and cook along as much as we can. There is a new recipe each week, and we post about that recipe on Friday. We are asked to refrain from posting the actual recipes on our blog. The book is filled with stunning photography, and personal stories about each recipe, which makes it that much more intriguing. I highly recommend adding it to your cookbook collection if you haven't already!

Friday, April 22, 2011

French Fridays with Dorie: Don't be a Mustard Stick in the Mud!


I'm delighted when one of our weekly French Fridays with Dorie recipes provides just what I need for a gathering that week. I was a little ahead of schedule for this one, and made these Mustard Bâtons last week for Pammy's birthday cocktail party at the Pink Palace (her darling, pink, beach cottage here on the island).


Dorie confessed she was embarrassed to admit she resisted this recipe for years, thinking three simple ingredients couldn't possibly make something great tasting, and good looking too. I wasn't very enthusiastic about these Mustard Sticks either, who attempt to sound fancier by calling themselves Mustard Bâtons.

"Boy, those French. They have a different word for everything."
-Steve Martin

Along with Dorie, I've been convinced and converted.  However, if you're determined to be a mustard stick in the mud, the basic version, which is really quite nice, with only Dijon mustard, and an optional sprinkling of poppy seeds, can be transformed with different fillings and/or toppings to make it appear you've slaved in the kitchen longer and dirtied a few more dishes. If that's the case, Dorie suggests alternative fillings such as olive tapenade, roasted peppers, pesto, or sun-dried tomatoes.  

Unbaked bâtons can be kept in the freezer for up to two months, and then brushed with egg wash, sprinkled with poppy seeds, and baked while still frozen. It's nice to have a few hors de'oeuvres like this in the freezer when friends stop by and you want a little nibblet to go with a glass of wine.

The recipe calls for a package (2 sheets) of thawed, frozen puff pastry. Working with one sheet at a time, roll out the pastry to a rectangle about 12 x 16 inches, and brush 1/4 cup of Dijon mustard over the lower half of the dough, with the shorter side closest to you.


Fold the top portion over the bottom, covering the mustard, cut strips about 3/4 inch thick (a pizza cutter works well), and transfer to a lined baking sheet.


Glaze the strips with a light egg wash, sprinkle with poppy seeds, and bake for about 15 minutes at 400 F, rotating the baking sheets half way through.


These are best served warm, and are especially tasty with white wine or kir, the official aperitif of Dijon, which is made with a measure of crème de cassis (blackcurrant liqueur) topped with white wine. You can bet I'll be stopping by the liquor store on my way home for crème de cassis and a bottle of wine, so I can see if just two ingredients can be combined to make a great tasting and good looking cocktail.

The complete recipe for Mustard Batons is published on Dorie's blog, In the Kitchen and on the Road with Dorie, here. The New York Times also published it here.


Moutarde de Dijon (Mustard Shop in Dijon)

French Fridays with Dorie is an online cooking group dedicated to Dorie Greenspan‘s newest book, Around My French Table: More Than 300 Recipes from My Home to Yours. As members of the group, we have purchased the cookbook and cook along as much as we can. There is a new recipe each week, and we post about that recipe on Friday. We are asked to refrain from posting the actual recipes on our blog. The book is filled with stunning photography, and personal stories about each recipe, which makes it that much more intriguing.


Wednesday, April 20, 2011

Garden to Table: Linguine with Red Walnuts and Swiss Chard

After a week of birthday celebrations with Pammy's limousine and Espresso-Frangelico Eclairs, and Sparks' yacht and Seashell Cake, I was ready to enjoy a few quiet evenings at home with John.

When John commented how beautifully our Swiss Chard was doing in the backyard, I suggested we try eating some of it. I used a few leaves under my Peruvian Ceviche not too long ago, and then promptly forgot it was back there. We have a very narrow yard that borders the back of our house, but you can only get a glimpse of the long box of herbs hanging on the fence when looking out the bathroom and bedroom windows. We also have a couple things growing in pots, including the Swiss chard, but I hardly go back there. This will be changing soon when we move in June. We will have a gorgeous yard and patio off the dining room and kitchen, with space for a few more vegetables. There's just something so satisfying about using the herbs and vegetables you've grown in your garden. As long as John continues to plant, water and grow them, I'll be happy to use them in my cooking.


I chose this Saveur pasta recipe mainly because of the Swiss chard, but also because of the Port Salut cheese and walnuts. And, with just a few ingredients, it was nice for a weeknight dinner.


Linguine with Red Walnuts and Swiss Chard
Adapted slightly from Saveur
Serves 2

1 cup shelled red walnut halves
10 ounces Swiss chard
2 tablespoons walnut oil
2 shallots, peeled and minced
3 cloves garlic, peeled and minced
Salt and freshly ground black pepper
8 ounces dried linguine
4 ounces Port-Salut or other semisoft cheese, coarsely grated

1. Place walnuts in a single layer in a medium skillet. Toast over medium heat, turning occasionally, for 7 minutes. Set aside. Trim chard leaves, discarding tough stems. Coarsely chop leaves and set aside.

2. Heat oil in a medium skillet over medium-low heat. Add shallots and garlic and cook, stirring occasionally, until shallots are soft, about 7 minutes. Add chard, season with salt and pepper, and cook, stirring, until chard has wilted, about 5 minutes.

3. Meanwhile, cook pasta in a large pot of boiling salted water until al dente, about 10 minutes. Drain, reserving about 1/4 cup of the cooking water. Add pasta and reserved cooking water to chard mixture. Stir in cheese and walnuts, adjust seasoning, and serve.


Port Salut (pronounced POOR sah-LEW) is a creamy, delectable semi-soft pasteurized cow's milk cheese from Mayenne, France, with a distinctive orange crust and a mild flavor.

Chard is very popular among Mediterranean cooks, but the first varieties have been traced back to Sicily. It has shiny green ribbed leaves, with stems that range from white to yellow to red, depending on the cultivator. The flavor is mild yet earthy and sweet with slightly bitter undertones. Fresh young chard can be used raw in salads. Mature chard leaves and stalks are typically cooked or sauteed; their bitterness fades with cooking, leaving a refined flavor which is more delicate than that of cooked spinach.


Monday, April 18, 2011

Seashell Cake for a 50th "White" Birthday Party, with a Decadent Buttercream Frosting

When asked to prepare a 50th birthday cake, I couldn't say no. When requested to wear all white to the party, I was tempted to say no. I now have my second seashell-themed cake under my belt, and a new white dress in my closet. Guests were treated to a sunset cruise on a gorgeous yacht, Champagne, hors d'œuvres, dinner, and a moonlight cruise back to Coronado. You only turn 50 once!


Although the process of preparing, decorating and transporting this size cake generated a good deal of stress, John was there by my side, encouraging me to relax and have fun with it. He dusted white chocolate seashells with luster dust and accepted the task of frosting the cake and piping the borders. With only a few hours remaining, we somehow managed to finish decorating, get dressed, drive the cake over to Tom Ham's Lighthouse, and make it back to the Coronado Boathouse in the nick of time for a pre-boarding cocktail.

This cake needed to serve 30 people, so I quadrupled the white cake recipe, which yielded two, 12-inch cake layers for the bottom, and two, 8-inch layers for the top. I made a luscious orange curd to spread between the layers (think orange creamsicle), and topped the curd with fresh sliced strawberries.


The white cake and orange cream curd recipes, both firsts for me, came from Joy of Cooking: 75th Anniversary Edition - 2006.  The vanilla buttercream came from Sweet Celebrations: The Art of Decorating Beautiful Cakes. I returned to the buttercream recipe I used for my first seashell cake last summer, because it is so decadently rich and smooth. Although our frosting and cake decorating skills are far from professional, the white chocolate seashells brushed with luster dust are fairly simple to make and add a touch of elegance.


A few candy pearls and a sprinkling of raw sugar completed this project.


I made the cake over two days, molding the white chocolate shells and baking the layers the night before, and then whipping the buttercream, and frosting and decorating the cake, the day of the party.

Vanilla Buttercream Icing - Classic Recipe
From Sweet Celebrations: The Art of Decorating Beautiful Cakes
Makes about 12 cups

Ingredients:

3 1/2 cups sugar
3/4 cup water
13 large egg whites, at room temperature
3 pounds (12 sticks) unsalted butter, at room temperature, cut into four pieces
6 tablespoons clear vanilla extract

Preparation:

Separate the egg whites from the yolks, and place the egg whites in the bowl of an electric mixer, with a wire whisk attachment, to have ready toward the end of preparing the sugar mixture. (See note below for freezing egg yolks for later use).

In a medium saucepan, combine the sugar and water. Mix with a wooden spoon until the sugar is mostly dissolved. Place the pan on the stove and use a clean pastry brush to paint the area just above the water line with water. Attach a candy thermometer to the side of the pan, and simmer the mixture over medium heat, without stirring. Watch the mixture until the thermometer reaches 240 degrees F (soft-ball state), about 5 to 7 minutes.

As the sugar nears the required temperature, begin beating the egg whites at medium speed until they turn begin to hold soft peaks and have at least doubled in volume, about 3 to 5 minutes. Do not overbeat.

When the sugar mixture has reached 240 degrees, turn the heat off. Turn the mixer up to high, and very carefully and slowly pour the hot sugar mixture in a thin and steady stream near the edge of the bowl and into the beaten egg whites. Beat for 20 to 35 minutes on medium to medium-high speed. The egg whites will lose some of their volume and the mixture should resemble a very thick meringue. The outside of the bowl should be moderately warm to touch.

Reduce the speed to medium-low and carefully add the room temperature butter pieces, one at a time. The mixture may break and begin to look like cottage cheese, but keep the mixer running, continue adding butter, and let the mixer whip the buttercream until it begins to get smooth, up to 10 minutes. Once the mixture is smooth, add the vanilla and beat for five minutes more.

At this point, the buttercream is now ready to be colored, using gel paste coloring, or chilled. If the buttercream is too soft, chill for 10 minutes and then whip again. If this doesn't work, cream 4 tablespoons of chilled butter, and then gently whip the creamed butter into the buttercream, 1 tablespoon at a time. Beat until the buttercream is smooth and there are no lumps.

Leftover buttercream can be frozen for up to three months.

Egg yolks can also be frozen, but only in small quantities so you can thaw only what you need. Label small containers with the date and number of egg yolks (between the cake and buttercream icing, we had 32 egg yolks!) To inhibit yolks from getting lumpy during storage, stir in a 1/2 teaspoon salt per 1 cup of egg yolks. If using for desserts, use 1 tablespoon sugar or corn syrup per 1 cup egg yolks. Use up extra egg yolks in recipes for sauces, custards, ice cream, yellow cakes, mayonnaise, and cooked puddings. It is best to thaw egg yolks in the refrigerator and use them as soon as they are thawed.

Happy Birthday, Sparky!


Friday, April 15, 2011

French Fridays with Dorie: Champagne, with Espresso-Frangelico Éclairs

This will be short and sweet, like my Espresso-Frangelico Eclairs with Bittersweet Chocolate Ganache.


Sure, they're cute now, but you should have seen the first round...flat as pancakes. Very sad. I suspect I had oven issues; too much heat escaped when I attempted to rotate the baking sheets, and then the oven wasn't hot enough and/or I didn't allow the eclairs to cook long enough. If it had been any other night, I would have dumped them in the trash and relaxed the remainder of the evening.

I was determined to go for round two and get them right, because these eclairs needed to be in a limo full of women at 9:30 a.m. the following morning, celebrating Pammy's birthday. What better to go with Champagne at that time of the morning?

After a brief sushi and sake break at the local sushi bar, I came home and mastered the second batch. I looked at Barefoot Contessa's recipe and compared it with Dorie's, made a few adaptations, piped the pâte à choux on one baking sheet, left the oven door closed throughout the baking, and increased the oven temperature and baking time just slightly.


Dorie's traditional recipe is for Vanilla Eclairs, filled with vanilla pastry cream, and glazed with confectioners' sugar, milk and a squeeze of lemon juice. She also offers variations for coffee/espresso and chocolate pastry creams, and chocolate ganache. To booze it up, which was a no-brainer for this crowd, it was easy to add a few tablespoons of Frangelico liqueur to the espresso pastry cream.  The chocolate ganache was another must do!

Happy girls!


French Fridays with Dorie is an online cooking group dedicated to Dorie Greenspan‘s newest book, Around My French Table: More Than 300 Recipes from My Home to Yours. As members of the group, we have purchased the cookbook and cook along as much as we can. There is a new recipe each week, and we post about that recipe on Friday. We are asked to refrain from posting the actual recipes on our blog. The book is filled with stunning photography, and personal stories about each recipe, which makes it that much more intriguing.

Thursday, April 14, 2011

Tyler's Ultimate Greek Salad with Grilled Calamari, in an Ultimate Phyllo Bowl

Renata of Testado, Provado & Aprovado! was our Daring Cooks’ April 2011 hostess. Renata challenged us to think “outside the plate” and create our own edible containers! Prizes are being awarded to the most creative edible container and filling, so vote on your favorite from April 17th to May 16th at The Daring Kitchen!

For this Daring Cooks' Challenge, we were instructed to make savory dishes, in edible savory containers. The possibilities are many, considering a "container" is simply defined as one that contains, i.e., holder, receptacle, vessel. I wanted to prepare something different, which was challenging because there are already so many creative ideas out there. Renata shared some of these ideas in her article, A Round-Up of incre-E-D-I-B-L-E containers, here.

I racked my brain and solicited ideas, but finally settled on attempting to make a king-sized version of a phyllo cup, in the form of a salad bowl large enough to hold a salad for four.

I had to figure out what to use for a mold, how many layers of phyllo I needed to make the bowl strong enough, and what my filling would be. When I think phyllo, I think Greek. I browsed through a few cookbooks and found Tyler Florence's Ultimate Greek Salad. Topped wiith grilled calamari, it had my name all over it.

I eyed my timpano pan hanging on the wall and decided it would make the perfect mold (it's 15 inches in diameter and quite large).


I buttered it generously to avoid any possibility of sticking, and proceeded to layer buttered sheets of phyllo inside the pan. I overlapped and reinforced, allowing some of the edges to gently drape over the edge of the pan. I think I used about 10-12 sheets of phyllo. I baked it at 325 degrees F for about 10 minutes, watching and rotating so the edges didn't get too brown. After baking, I allowed it to cool about 5 minutes, carefully loosed the phyllo bowl from the pan, and slipped it out onto a baking sheet. I returned the freestanding bowl to the oven, which was turned off but still warm, and allowed it to rest and dry a bit more while I prepared the salad.


It appeared extremely delicate, but was surprisingly sturdy.


I tossed the salad in another bowl first, and then transferred it to the phyllo bowl which I had placed on my Beast's Feet serving platter. As I started adding salad, I cringed when I heard little crackling noises as the weight of the salad settled against the crispy phyllo walls. I held my breath as John quickly snapped away with the camera, praying the walls would not come crashing down, spilling salad all over the table.


Success! The phyllo bowl was a unique presentation, complemented the Greek salad within, and provided an element of fun - throughout dinner, we were all reaching in and breaking off pieces buttery, flaky phyllo to eat with our salad. The Greek salad can be prepared with or without the calamari, or you can substitute roasted or grilled chicken.

The Ultimate Greek Salad with Grilled Calamari
Minimally adapted from Tyler's Ultimate: Brilliant Simple Food to Make Any Time
Serves 4

10 small whole calamari, bodies only (3/4 to 1 pound)
½ cup extra-virgin olive oil
¼ cup red wine vinegar
4 garlic cloves, chopped
1 tablespoon dried oregano
1 tablespoon fresh oregano leaves, plus extra for garnish
1 tablespoon fresh thyme leaves
Juice of 1 lemon
Kosher salt and freshly ground pepper
1 pint cherry tomatoes, halved, or one large tomato, cut into wedges
1 small red onion, thinly sliced
1 medium cucumber, thinly sliced
½ pound feta cheese, crumbled
1 cup kalamata olives, pitted
1 head romaine lettuce, torn into bite sized pieces
Lemon wedges, for garnish

The vinaigrette serves as a marinade for the calamari and dressing for the salad.

Start by rinsing the calamari tubes and patting them dry. Place the calamari in a medium bowl.

To make the vinaigrette, whisk together the oil, vinegar, garlic, dried and fresh oregano, thyme, and lemon juice, and season with salt and pepper. Pour half the vinaigrette over the calamari and set the rest aside while you make the salad.

Put a large grill on the stove over medium-high heat, or preheat an outdoor gas or charcoal grill and get it very hot.

Combine the tomatoes, onion, cucumber, cheese, olives, and romaine in a large bowl. Pour the remaining vinaigrette over the salad and toss to combine.

Lightly oil the grill pan or grates of the grill with canola oil (take a few paper towels and fold them over several times to make a thick square. Put a small amount of oil on the paper towels, then carefully and quickly wipe the hot grates of the grill to make a nonstick grilling surface). Put the calamari in the grill pan or on the grill and cook for 2 minutes per side. Cut the grilled tubes into rings.

To serve, arrange the salad on a large platter and scatter the calamari on top. Garnish with fresh oregano leaves and lemon wedges.


Don't forget to go to The Daring Kitchen website and vote for the most creative edible container and filling. You can visit the recipe archives for the complete challenges and recipes, and the Daring Cooks' blogroll for links to the members' blogs. If you love to cook, and can be a little daring in the kitchen, sign up and cook along with us!

Thank you, Renata, for sharing your article about edible containers and hosting this month's challenge. Now you know, the creativity of the Daring Cooks' community cannot be contained!

Wednesday, April 13, 2011

Wildflowers Wednesday

It's a busy week, but I wanted to slip in a Wildflowers Wednesday post today, rather than a Tranquil Thursdays post tomorrow, because I will be sharing my Daring Cooks' Challenge tomorrow, and a French Fridays with Dorie post on Friday.

This past weekend, John and I took a day trip out to Anza-Borrego Desert State Park and looped back around through the local mountains, where there was a recent dusting of snow.  The desert wildflowers were in bloom, although not as much as in some areas.  It was a relaxing day before the flurry of this week's activities.


Enjoy the rest of your week!

Denise & John